Showing posts with label art. Show all posts

Feb 3, 2015

Jenn's DIY Homemade Cupcakes

Welcoming February, the month of love, with something sweet, it's cupcakes!
This practice the little hands' fine motor skill and some creativity.


What you need:

  • Cardboard
  • Punched origami papers
  • Scissor
  • Marker
  • Glue


How to do:

  1. Draw cupcakes and strawberries on the cardboard.
  2. Cut the shape out and color it with marker (your little ones might need your help for this)
  3. Let them decorate the cupcakes with some punched origami papers as smarties and the strawberry


Jan 15, 2015

Christmas Tree Card

This is the Christmas card that Jenn made for 2014, simple yet cute! I know it's too late for Christmas, but you may change the theme into some other events, or maybe this year's Christmas card =)


What you need:

  • Plain white cardboard
  • Circle stickers (combination of light and dark green)
  • Pen


Instructions:

  1. Draw dots on the paper which will form a Christmas tree
  2. Place the stickers on the dots
  3. Don't forget to add a star on the top of the tree
  4. Write a message on the back side


Jan 13, 2015

DIY Snowflake for toddler

I know it's really late to post crafts with Christmas theme, but late is better than nothing. December is identical with snowy winter season, so snowflake is the DIY craft for toddlers this time.


What you need:

  • Plain white paper
  • Origami
  • Puncher
  • Scissor
  • Glue


Instructions:

  1. Draw circles on the paper and cut them out
  2. Fold the circles into 4 and cut on the edges, adults may help with this
  3. Punch colorful origami papers
  4. Decorate the snowflakes with the punched papers

Oct 22, 2014

Bead Threading for Toddler

Bead threading is an activity which improves their fine motor control, strengthening those little muscles in their hand. I found it also helps for hand and eye coordination and also concentration skill. This activity involves small item: beads, please never leave them unattended while doing this activity.


What you will need:
Beads
Thread (It works well with pipe cleaners too!)

Oct 20, 2014

Letter push pin activity

I had this cork board for a long time but didn't have a chance to use it, I was so happy when I saw a lot of toddler activities idea!
This time I'm gonna make an alphabet using the push pins and let her connect it to each other by using colorful elastic bands. 


This activity improves their fine motor control, hand and eye coordination and also concentration skill. This activity involves small item: push pin, please make sure to keep an eye on them and never leave them unattended while doing this activity.
If you don't feel at ease, please don't do this activity with your toddler.


What you need:
Cork board
Push pins
Elastic bands

Oct 14, 2014

Eye Dropper Activity for Toddler

I love to teach Jenn while she plays, it's more fun and easier for her to absorb the lesson. Today's activity involves messy play and colors, I put on a plastic bib on her.


What you need:
Eye dropper or pipettes
Food coloring
Thick napkins/paper

All you have to do is teach them how to use the eye dropper and let them explore as long as they want. Eye dropper is a good tool to improve their fine motor skills, have fun! 


Oct 13, 2014

Basic Prewritting

It's time for prewritting skill! It's a very basic activity for Jenn, it improves her fine motor skill and get her ready to write at school too. 


This activity also allow me to correct her way to hold a pen. She still needs a lot of practices in prewritting, but it's a good start for her! I'm gonna make more prewritting activity for her, stay tune! =)

9

Oct 9, 2014

Counting Shape

Jenn enjoyed and did well in this activity, it includes shapes, colors and counting. Let's give it a try!


What you need:
Paper
Marker Pen
Stickers

How:
Print out different shapes for each task, color it with differently too.
They are required to count the shapes and stick down the stickers on the box.


Oct 8, 2014

Name Recognition

Jenn is very familiar with alphabets, so I decided to make a name recognition for her. It's a simple sticking sticker activity, which requires them to match the alphabets.


What you need:
Paper
Stickers
Marker Pen

How:
Make circles and write down the alphabets of their name on it
Get the stickers ready and write down alphabets on it too


Hope they will love it too! 

Oct 6, 2014

Counting Cards with Clothes Pin

I'm still doing a lot of activity in counting for Jenn, let's make it fun again this time!


What you need:
Cardboard
Origami Papers
Clothes Pin
Scotch Tape
Glue
Scissor

Firstly, write down the numbers on origami papers and cut them out. I made them in different colors, just to make it more colorful. Then cut cardboard into same sizes and glue the numbers on it. I cover the cardboard with scotch tape, just to make it difficult to be torn.

How to play? Just simply ask your toddler to put on the clothes pin on the cardboard, based on the number written on it. Happy counting! 

Oct 3, 2014

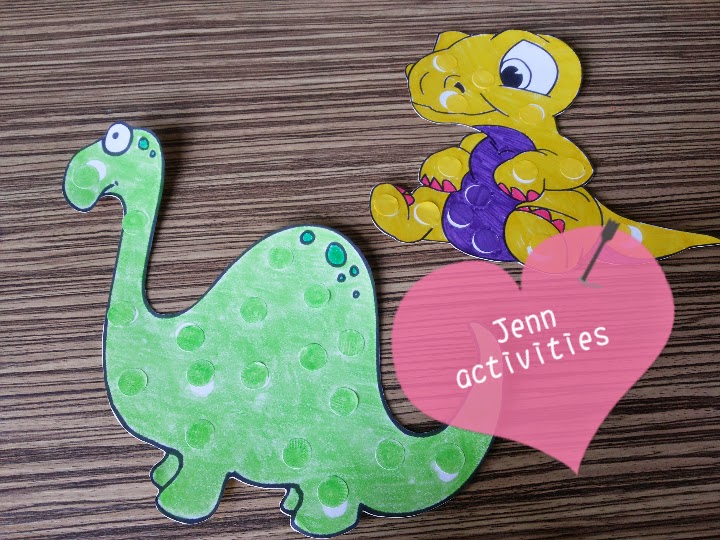
Dinosaur

Start introducing dinosaur to Jenn, it's another simple sticking stickers activity. 
She still can't do it perfectly, but I'm still proud of her. 
You'll be amazed how they improved from time to time.


What you need:
Cardboard
Markers/pencil colors/crayon
Stickers

I searched the dinosaur from the net, simply printed it out and colored it, don't forget to leave some blank spots for the stickers.


Enjoy the activity! 

Sep 12, 2014

Colorful Toothpicks Activity

I love making DIY toys for Jenn, and this is one of them. It's a simple color recognition activity and also practice their little fingers' muscles.


What you need:


  • Empty bottle (I upcycled a mineral water bottle)
  • Thick plastic (as the cover)
  • Colorful stickers
  • Toothpick
  • Rubber bands
  • Marker
We had to color the toothpicks with markers, we made 6 different colors. You may have more colors, depends on the size of your bottle. Stick on colorful stickers and make a hole, not too big, but just enough to fit in the toothpicks. Cover the bottle with the plastic and secure with rubber bands.


Jenn needs extra patient and concentration to do this activity, but she loves it so much. She will ask for more when all the toothpicks are inside the bottle.

Aug 11, 2014

Counting Tree

Jenn is learning to count, she still can't count properly. Sometimes she start counting from two, and sometimes she just say one to ten without really counting the things i asked. So this time, let's make counting more fun!


What I used:

  • Scissor
  • Glue
  • Origami paper
  • Old calendar (I love to upcycle stuff at home!) - Cut it into tree shape and tree trunks, cover up with origami papers.
  • Colorful stickers - Write numbers on each color as the task to stick as many stickers as written on it.


Happy sticking, happy counting and have a great day! 

Jul 10, 2014

Learning alphabet "A"

Jenn started to learn alphabets couple of months ago, and it's time to do some activity with alphabets on!
To make it more fun, I decided to let her do different activities on each letters.
For the letter A, I had two activities: stick colorful stickers and coloring with markers. 

You need:

Printed paper
Colorful round stickers
Markers

Print the letter "A" on a piece of paper and draw colorful circle on it. Let them match the sticker color with the circle color that you draw.


Next activity includes a picture of apple for the letter of A. 


Happy learning ABC! =)

Jul 2, 2014

Simple Painting Activity

Recently, I shared a post of how to make an Edible Paint for your toddler. I prefer edible paint, because it's safer for them to play around with. Love this painting idea, you should give it a try!

You will need:
  • Edible paints
  • Thick paper
  • Q-tips

Drop lumps of paints on the paper. I had couple of different colors, just to make it more attractive.


Let them make mess on it, Jenn is so excited about this!


And this is the result!


Show me yours! =)

Jun 30, 2014

Edible Paint

I LOVE waterbased paint so much, because the stains can be cleaned up easily. But our toddlers are usually curious and try to taste everything attractive to them. So I decided to google up the ingredients to make edible paint and I ended up with this:

  • 1 cup water
  • 1 tbsp corn starch
  • food coloring

Put water and corn starch in a pan, stir until it mixed well, cook over low heat and keep stirring until it gets thicker. 

Pour it into some cups and add food coloring until you get the desired color. Let it cool down and get ready for painting activities!


Happy painting! =)

Jun 26, 2014

DIY Train

We have empty milk cartons every two days, can you imagine how many we have?
Instead of throwing it away, we upcycle it into crafts. 

Upcycle milk cartons into train is one of the must do craft, it's easy and useful.
Use it to store kids' hair clips, craft accessories, pencil holder or even let them use it as their toy!
This time, we have Lio as Jenn's fave cousin to make the train together.


Materials needed:
  • Milk cartons
  • Thick paper
  • Waterbased paint
  • Cardboard
  • Marker
  • Glue
  • Scissor

Firstly, fully cover the milk carton with thick paper, I used drawing paper which is not easy to tear off. Then cut cardboards into circles as the train's wheels, color it with black marker.

Then let those little hands do their art by using marker or waterbased paint, but please keep an eye on them, they might paint your wall or even try to taste it!
I let them to use colorful markers at the beginning but seems like they're not interested with it, so I let them to use the paint for the rest of it.


Making an edible paint is a good idea, since toddlers like to taste everything new, I'll make one for the next project!

Let the paint dry off, and stick the wheels on both sides. 
Jenn couldn't wait for the train, she quickly take out her animals collection and look at that big smile she got on her face!


Jun 22, 2014

DIY Birthday Banner

On granny's birthday, we decided to make something for her.

We made cute bunny birthday card, link for step by step instruction of Bunny Birthday Card


And these are what we need for the banner:
  • Cardboard
  • Crepe paper
  • Marker
  • Scissor
  • Glue


1. Make circles with the cardboard. Then I let Jenn make scratches with pencil color on it.

2. Write the word "HAPPY BIRTHDAY" on the cardboard with colorful markers.

3. Make ruffle with the crepe paper around the cardboard. 


Happy Birthday, Granny! We  you

Jun 20, 2014

DIY Bunny Snack Cover

Are you ready for another RABBIT craft? Yessss, Jenn is sooooo crazy about rabbits!

This time we wanna give a snack for Jenn's godmom with a very cute decoration on it, hope she like it and you guys like it too!


These are what you need:

Origami paper
Paper 
Scissor
Glue
Scotch tape
Snack


If you wanna have the paper with paints on like we do, you may follow the steps on DIY Upcycle Pencil Holder

Take out the snack cover gently and draw the shape on the painted paper.

Cut the shape out and stick it on the snack, and cut some more for the ears.


Stick it on the snack, we secure it with scotch tape at the end.


Add up some decoration, we made eyes, smiling mouth with rabbit teeth and a ribbon.


And it's done!