Showing posts with label cardboard. Show all posts

Feb 4, 2015

Jenn the lil Gardener

Jenn loves gardening sooooo much, she keeps playing it again and again..!
Hope your kids enjoy it too =)


What you need:

  • Popsicle sticks
  • Cardboard
  • Flower pot
  • Waterbeads
  • Gardening tools ( I have mini gardening fork, spade and watering can )


How to do:

  1. Draw flowers on the cardboard, color them and cut the shape out.
  2. Color the popsicles with green color and stick the flowers on them.
  3. Place the waterbeads in a big container, so they can move them to the flower pot by gardening spade.
  4. Let them plant the flowers.


Feb 3, 2015

Jenn's DIY Homemade Cupcakes

Welcoming February, the month of love, with something sweet, it's cupcakes!
This practice the little hands' fine motor skill and some creativity.


What you need:

  • Cardboard
  • Punched origami papers
  • Scissor
  • Marker
  • Glue


How to do:

  1. Draw cupcakes and strawberries on the cardboard.
  2. Cut the shape out and color it with marker (your little ones might need your help for this)
  3. Let them decorate the cupcakes with some punched origami papers as smarties and the strawberry


Oct 6, 2014

Counting Cards with Clothes Pin

I'm still doing a lot of activity in counting for Jenn, let's make it fun again this time!


What you need:
Cardboard
Origami Papers
Clothes Pin
Scotch Tape
Glue
Scissor

Firstly, write down the numbers on origami papers and cut them out. I made them in different colors, just to make it more colorful. Then cut cardboard into same sizes and glue the numbers on it. I cover the cardboard with scotch tape, just to make it difficult to be torn.

How to play? Just simply ask your toddler to put on the clothes pin on the cardboard, based on the number written on it. Happy counting! 

Oct 3, 2014

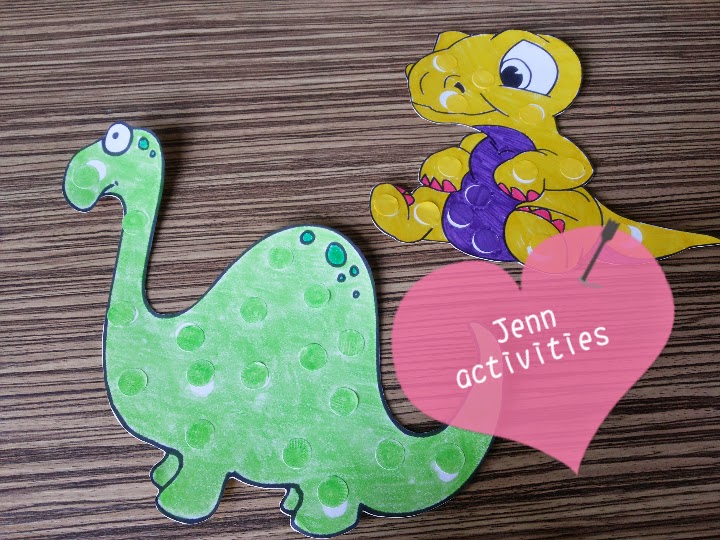
Dinosaur

Start introducing dinosaur to Jenn, it's another simple sticking stickers activity. 
She still can't do it perfectly, but I'm still proud of her. 
You'll be amazed how they improved from time to time.


What you need:
Cardboard
Markers/pencil colors/crayon
Stickers

I searched the dinosaur from the net, simply printed it out and colored it, don't forget to leave some blank spots for the stickers.


Enjoy the activity! 

Sep 29, 2014

SUN-shine

After everyone was down couple of days ago, now mommy was down too with fever! But I can't wait to make this sun activity for Jenn. 

What you need:
Cardboard (thick!)
DIY Edible Paint
Origami Paper
Scissor
Scotch Tape
Marker pen

Firstly, I let her paint on a thick cardboard with DIY edible paint. She may use her finger, cotton buds or anything that she wants. Then you have to wait until it gets dry. 


You may cut some origami papers while waiting for the painting. I used red, orange and yellow colors to stick on the sun.

Once the painting dries, cut a big circle and you may start sticking on origami papers on the circle's edges with scotch tape. I added smiley face to make it cute!


Jenn didn't finish her job, mommy have to do most of it. We may give it another try next time! Black heart (cards)

Sep 9, 2014

Big vs Small

I was trying to introduce big and small sizes to Jenn with this activity, but seems like she didn't get it. It's a simple sticking stickers activity, you may wanna give it a try.


What you need:
Cardboard
Origami paper
Sticker
Glue
Scissor


Firstly, prepare the circles by using origami paper and sticker, I used colorful sticker and paper to make it more fun. Then instruct your child to pick the circle and stick it on the cardboard. When they can differentiate between big and small, you may ask them with detail, eg: big yellow circle. It practice their knowledge about color too!

Sep 1, 2014

Silly Monster

Jenn watched Monster inc and she loves it! Here's an activity to make silly monsters with so much fun! It involves sticking eyes and mouth stickers.


What you need:
Cardboard
Origami paper
Googly eyes
Stickers

I prepare the monster's shapes, and let Jenn to stick as much eyes as she wants and mouth for each monster.


And this is the result, don't be surprise if the monsters have a very strange look.


Aug 26, 2014

Jenn's Splendid Ice Cream

Start introducing ice cream to Jenn couple of months ago, and she loves it! Well, who wouldn't love ice cream?
This is another simple counting activity and let's make it more fun!


What you need:
  • Origami paper
  • Cardboard
  • Glue
  • Scissor
  • Colorful sticker

Firstly, cut out ice cream shape for them, or let them practice the cutting skill. I used colorful origami paper to present different flavors of ice cream.


Let's start the sticking time, starting with the cone and followed with  scoop ice creams, they can have a single scoop, double scoop or even more, it's up to them!


Then I used colorful stickers as the smarties, let them stick as much as they want too, and remember to practice counting!


It's suitable for a birthday card, birthday invitation and also to congratulate newborns =)


Aug 14, 2014

Learning Alphabet "D"

It's been a while since she mess around with pencil color, crayon and paint, so here is a simple activity for letter D.

Print out a big and small letter of D with a picture of duck and dog. Let them use whatever they want to color it with.


My little Picasso is doing her thing, busy picking colors.


Jenn used crayon, pencil color and paint for this activity. This is the final of her coloring activity. 


Aug 11, 2014

Counting Tree

Jenn is learning to count, she still can't count properly. Sometimes she start counting from two, and sometimes she just say one to ten without really counting the things i asked. So this time, let's make counting more fun!


What I used:

  • Scissor
  • Glue
  • Origami paper
  • Old calendar (I love to upcycle stuff at home!) - Cut it into tree shape and tree trunks, cover up with origami papers.
  • Colorful stickers - Write numbers on each color as the task to stick as many stickers as written on it.


Happy sticking, happy counting and have a great day! 

Aug 3, 2014

DIY Birthday Cake Theme Card

Cousin's birthday is coming, so it's time for Jenn to make another DIY craft. We've prepared a gift for him, wrapped it nicely, but we need a birthday card! 
Instead of buying an ordinary card, making a birthday cake theme card popped out of my mind.


Here are what you need:
Origami paper
Marker
Glue
Scissor
Cardboard
Colorful stickers


We created a lot trash in our daily life: milk box, cereal box, cardboard flyers or invitations. Instead of trashing it, we can upcycle those into useful stuff, and it prevents the earth from getting any worse.

This time we used an old cardboard invitation as the main material. Draw a cake on the cardboard, cover the surface with origami paper. Don't forget to make the candles on the top of the cake, and cut out the shape.

I let my girl to stick the colorful sticker, asked her about the colors and also asked her to count them. It's a simple activity but also lots to learn about. 


Jul 21, 2014

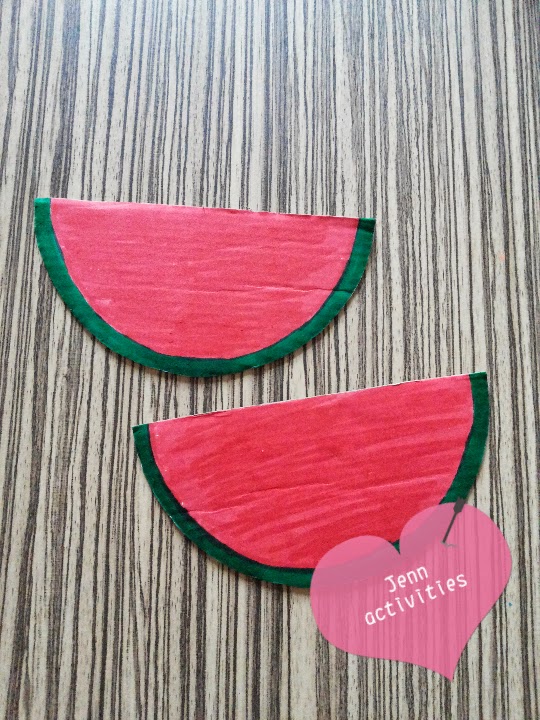
Watermelon, fresh up your day!

During these hot days, let's fresh up your day with this fun watermelon activity!
It's another sticking stickers and counting activity.


Things you need:
  • Cardboard
  • Black dot stickers
  • Markers
  • Popsicle sticks


How:
  1. Make a circle on the cardboard, and cut it into half to make two pieces of watermelon.
  2. Color green and red as the outter and inner watermelon.
  3. I let Jenn sticks the black dot stickers as the seeds and counts how many seeds on it.
  4. Stick popsicle sticks at the back to let them carry around.


Jul 16, 2014

Cute Ladybug

Ladybug is such a cute insect, Jenn see lots of ladybugs from her storybook and some of her toys. She loves them so much, let's make some of them!


What you need:
  • Cardboard
  • Marker
  • Googly eyes
  • Scissor
  • Glue
  • Black circle stickers
  • Popsicle stick


How to make:
  1. Cut 2 sizes of circles, for the head and body. 
  2. Color the bigger circle with red marker, left some part at the middle.
  3. Fully color the smaller circle with black marker.
  4. Let them stick the black circle stickers at the body.
  5. Stick the googly eyes at ladybug's head, and stick it together to the body.
  6. At last, stick the popsicle stick at the back side.


Jul 12, 2014

Learning Alphabet "B"

Continue learning the alphabets, here come the letter B activity.
We're gonna paint a bear with edible paint, this is recipe to make edible paint.
I had red, yellow and green paint for her to mess around with.


You will need:
Paper with drawings on
Edible paints
Q-tips

I ask her to spell the word BEAR, then let her paint the bear.

Jenn enjoys painting her bear, look at that happy face when she do the activity!


This is another simple activity for her, coloring the letter "B" and a ball. 


Happy Learning! =)

Jul 2, 2014

Simple Painting Activity

Recently, I shared a post of how to make an Edible Paint for your toddler. I prefer edible paint, because it's safer for them to play around with. Love this painting idea, you should give it a try!

You will need:
  • Edible paints
  • Thick paper
  • Q-tips

Drop lumps of paints on the paper. I had couple of different colors, just to make it more attractive.


Let them make mess on it, Jenn is so excited about this!


And this is the result!


Show me yours! =)

Jun 26, 2014

DIY Train

We have empty milk cartons every two days, can you imagine how many we have?
Instead of throwing it away, we upcycle it into crafts. 

Upcycle milk cartons into train is one of the must do craft, it's easy and useful.
Use it to store kids' hair clips, craft accessories, pencil holder or even let them use it as their toy!
This time, we have Lio as Jenn's fave cousin to make the train together.


Materials needed:
  • Milk cartons
  • Thick paper
  • Waterbased paint
  • Cardboard
  • Marker
  • Glue
  • Scissor

Firstly, fully cover the milk carton with thick paper, I used drawing paper which is not easy to tear off. Then cut cardboards into circles as the train's wheels, color it with black marker.

Then let those little hands do their art by using marker or waterbased paint, but please keep an eye on them, they might paint your wall or even try to taste it!
I let them to use colorful markers at the beginning but seems like they're not interested with it, so I let them to use the paint for the rest of it.


Making an edible paint is a good idea, since toddlers like to taste everything new, I'll make one for the next project!

Let the paint dry off, and stick the wheels on both sides. 
Jenn couldn't wait for the train, she quickly take out her animals collection and look at that big smile she got on her face!


Jun 22, 2014

DIY Birthday Banner

On granny's birthday, we decided to make something for her.

We made cute bunny birthday card, link for step by step instruction of Bunny Birthday Card


And these are what we need for the banner:
  • Cardboard
  • Crepe paper
  • Marker
  • Scissor
  • Glue


1. Make circles with the cardboard. Then I let Jenn make scratches with pencil color on it.

2. Write the word "HAPPY BIRTHDAY" on the cardboard with colorful markers.

3. Make ruffle with the crepe paper around the cardboard. 


Happy Birthday, Granny! We ♥ you