Showing posts with label green. Show all posts

Jan 15, 2015

Christmas Tree Card

This is the Christmas card that Jenn made for 2014, simple yet cute! I know it's too late for Christmas, but you may change the theme into some other events, or maybe this year's Christmas card =)


What you need:

  • Plain white cardboard
  • Circle stickers (combination of light and dark green)
  • Pen


Instructions:

  1. Draw dots on the paper which will form a Christmas tree
  2. Place the stickers on the dots
  3. Don't forget to add a star on the top of the tree
  4. Write a message on the back side


Oct 6, 2014

Counting Cards with Clothes Pin

I'm still doing a lot of activity in counting for Jenn, let's make it fun again this time!


What you need:
Cardboard
Origami Papers
Clothes Pin
Scotch Tape
Glue
Scissor

Firstly, write down the numbers on origami papers and cut them out. I made them in different colors, just to make it more colorful. Then cut cardboard into same sizes and glue the numbers on it. I cover the cardboard with scotch tape, just to make it difficult to be torn.

How to play? Just simply ask your toddler to put on the clothes pin on the cardboard, based on the number written on it. Happy counting! 

Sep 12, 2014

Colorful Toothpicks Activity

I love making DIY toys for Jenn, and this is one of them. It's a simple color recognition activity and also practice their little fingers' muscles.


What you need:


  • Empty bottle (I upcycled a mineral water bottle)
  • Thick plastic (as the cover)
  • Colorful stickers
  • Toothpick
  • Rubber bands
  • Marker
We had to color the toothpicks with markers, we made 6 different colors. You may have more colors, depends on the size of your bottle. Stick on colorful stickers and make a hole, not too big, but just enough to fit in the toothpicks. Cover the bottle with the plastic and secure with rubber bands.


Jenn needs extra patient and concentration to do this activity, but she loves it so much. She will ask for more when all the toothpicks are inside the bottle.

Sep 9, 2014

Big vs Small

I was trying to introduce big and small sizes to Jenn with this activity, but seems like she didn't get it. It's a simple sticking stickers activity, you may wanna give it a try.


What you need:
Cardboard
Origami paper
Sticker
Glue
Scissor


Firstly, prepare the circles by using origami paper and sticker, I used colorful sticker and paper to make it more fun. Then instruct your child to pick the circle and stick it on the cardboard. When they can differentiate between big and small, you may ask them with detail, eg: big yellow circle. It practice their knowledge about color too!

Sep 1, 2014

Silly Monster

Jenn watched Monster inc and she loves it! Here's an activity to make silly monsters with so much fun! It involves sticking eyes and mouth stickers.


What you need:
Cardboard
Origami paper
Googly eyes
Stickers

I prepare the monster's shapes, and let Jenn to stick as much eyes as she wants and mouth for each monster.


And this is the result, don't be surprise if the monsters have a very strange look.


Aug 11, 2014

Counting Tree

Jenn is learning to count, she still can't count properly. Sometimes she start counting from two, and sometimes she just say one to ten without really counting the things i asked. So this time, let's make counting more fun!


What I used:

  • Scissor
  • Glue
  • Origami paper
  • Old calendar (I love to upcycle stuff at home!) - Cut it into tree shape and tree trunks, cover up with origami papers.
  • Colorful stickers - Write numbers on each color as the task to stick as many stickers as written on it.


Happy sticking, happy counting and have a great day! 

Aug 3, 2014

DIY Birthday Cake Theme Card

Cousin's birthday is coming, so it's time for Jenn to make another DIY craft. We've prepared a gift for him, wrapped it nicely, but we need a birthday card! 
Instead of buying an ordinary card, making a birthday cake theme card popped out of my mind.


Here are what you need:
Origami paper
Marker
Glue
Scissor
Cardboard
Colorful stickers


We created a lot trash in our daily life: milk box, cereal box, cardboard flyers or invitations. Instead of trashing it, we can upcycle those into useful stuff, and it prevents the earth from getting any worse.

This time we used an old cardboard invitation as the main material. Draw a cake on the cardboard, cover the surface with origami paper. Don't forget to make the candles on the top of the cake, and cut out the shape.

I let my girl to stick the colorful sticker, asked her about the colors and also asked her to count them. It's a simple activity but also lots to learn about. 


Jul 27, 2014

Introduction to Shape

Jenn have learned about alphabets, numbers, animals, colors and it's time for introducing her to shapes. Let's get started!


What you need:

  • Origami papers
  • Glue
  • Cardboard


Cut shapes of circle, triangle, square and rectangle using origami papers.
Make sure to use colorful origami papers, kids find it more interesting.

Tell them the shape names and how it looks like. 
Let them stick the shape you asked on the cardboard, you may ask them specifically. For example: Blue triangle, orange square, purple circle, red rectangle.

Keep repeating the shapes until they memorize them.


Jul 23, 2014

Colorful Wheel

Teaching color is so much fun with this DIY colorful wheel! This is so simple yet cheap activity.


These are what you need:

  • Cardboard
  • Marker
  • Scissor
  • Clothes pins

How:
Make a circle on the cardboard and cut it.
Color the cardboard with colorful markers. 
And viola - it's done!


Squeezing the clothes pin was kinda difficult for her.
She need both of her hands to pinch those, so I gotta hold the colorful wheel while she pinch to open it.
Practise makes perfect, after couple of times, she can manage to hold her own colorful wheel and put on the clothes pins.

Jul 21, 2014

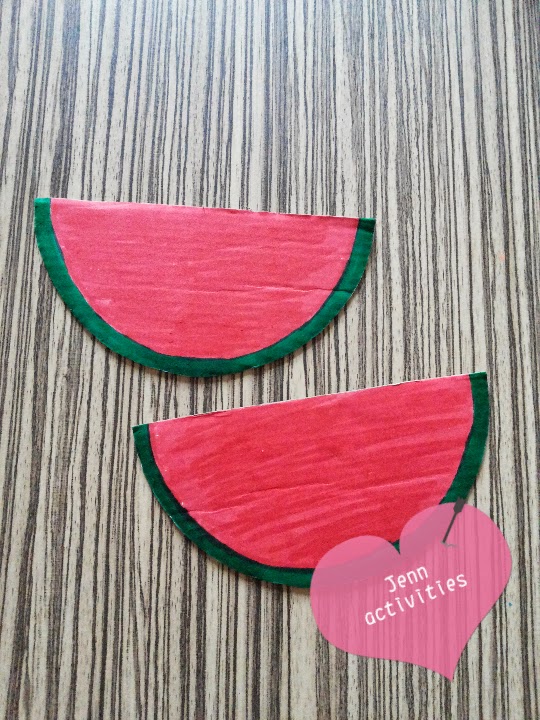
Watermelon, fresh up your day!

During these hot days, let's fresh up your day with this fun watermelon activity!
It's another sticking stickers and counting activity.


Things you need:
  • Cardboard
  • Black dot stickers
  • Markers
  • Popsicle sticks


How:
  1. Make a circle on the cardboard, and cut it into half to make two pieces of watermelon.
  2. Color green and red as the outter and inner watermelon.
  3. I let Jenn sticks the black dot stickers as the seeds and counts how many seeds on it.
  4. Stick popsicle sticks at the back to let them carry around.


Jul 14, 2014

Edible Dough

I'm sure every kids love to play dough, this is how to make your own play dough, without harming ingredients!


Ingredient:

  • Water
  • Flour
  • Corn starch
  • Food coloring

The ratio for this recipe is flour:corn starch = 2:1


  1. Mix 2 tbsp flour with 1 tbsp corn starch. 
  2. Add up a very little bit of water and mix well, keep on adding the water until you get the texture.
  3. Add up food coloring and mix well.


I made small amounts of dough with couple of colors.


Special thanks to Sirly for the recipe! 

Jul 12, 2014

Learning Alphabet "B"

Continue learning the alphabets, here come the letter B activity.
We're gonna paint a bear with edible paint, this is recipe to make edible paint.
I had red, yellow and green paint for her to mess around with.


You will need:
Paper with drawings on
Edible paints
Q-tips

I ask her to spell the word BEAR, then let her paint the bear.

Jenn enjoys painting her bear, look at that happy face when she do the activity!


This is another simple activity for her, coloring the letter "B" and a ball. 


Happy Learning! =)

Jul 2, 2014

Simple Painting Activity

Recently, I shared a post of how to make an Edible Paint for your toddler. I prefer edible paint, because it's safer for them to play around with. Love this painting idea, you should give it a try!

You will need:
  • Edible paints
  • Thick paper
  • Q-tips

Drop lumps of paints on the paper. I had couple of different colors, just to make it more attractive.


Let them make mess on it, Jenn is so excited about this!


And this is the result!


Show me yours! =)